2022-10-16 13:52:24
Was ist Digitalisierung?
Die Video-AG des Engelsburg-Gymnasiums hatte der hessischen "Digitalministerin" Prof. Dr. Kristina Sinemus ein paar Fragen gestellt. Unter anderem stellten die Kinder die Frage: "Was ist Digitalisierung eigentlich?"
Das war ihre Antwort:
Digitalisierung ist eine Möglichkeit, um über Infrastruktur, also die
Anwendung sozusagen auf den Glasfasernetzen, neue Ideen in die Umsetzung zu
bringen. Digitalisierung heißt Anschlüsse und mathematische Algorithmen - die
Einsen und die Nullen.
Alternativ dazu die spontane Antwort einer 15-jährigen Schülerin auf dieselbe Frage:
Wenn man zum Beispiel tägliche Handlungen vereinfacht, indem man sie von
analog zu digital umwandelt.
Diese spontane Antwort der Schülerin entspricht ungefähr einer vereinfachten Definition auf digital-magazin.de:
Die einfachste Definition von Digitalisierung besagt, dass analoge Inhalte
oder Prozesse in eine digitale Form oder Arbeitsweise umgewandelt werden.
Die Erklärung von Frau Prof. Dr. Sinemus ist nicht nur leicht am Thema vorbei, sondern sogar falsch. Digitalisierung ist unabhängig von Netzen und erst recht sind Glasfasernetze keine Voraussetzung für Digitalisierung. Wenn jemand z.B. Anfang der 80er Jahre auf einem Apple II (=unvernetzt) ein Textdokument erstellt hat, das vorher nur handschriftlich vorlag, und das dann mehrfach ausgedruckt hat, dann stellte das bereits eine "Digitalisierung" dar. Ebenso werden nicht zwingend Algorithmen benötigt für Verarbeitung, Speicherung und Übertragung digitaler Daten. Und "Anschlüsse" sind ebenso irrelevant.
2021-01-24 18:19:18
Jitsi Meet RPM packages for RHEL/CentOS/OEL 7
First enable tuxad repository:
rpm -i http://www.tuxad.com/repo/7/tuxad.rpm
We also need the EPEL repository. If you don't have it configured then follow the instructions on fedoraproject.org/wiki/EPEL.
Next required repo is nodesource. Enable it via tuxad meta package:
yum install nodesource-release-el7
Install jitsi-meet-install package which will by dependency also install other required packages:
yum install jitsi-meet-install
Add two entries to your DNS server to point to the server you are installing on:
- jitsi.YOURDOMAIN.COM
- auth.jitsi.YOURDOMAIN.COM
After DNS is set up the final Jitsi Meet configuration can be done. The configuring script will call certbot to get certificates from Let's Encrypt.
It is important that (at least when running the configure script) no service is running on TCP port 80. If you have an http server running on this port then shut it down, run the configure script and then start it up again.
The configure script requires at least the IP address (IPv4) and the hostname. Example:
jitsi-meet-install.sh 1.2.3.4 jitsi.example.com
Run this script with your own settings. You are done!
2020-03-23 01:48:49
Power Measuring several SSDs (Crucial, Kingston, Apacer)
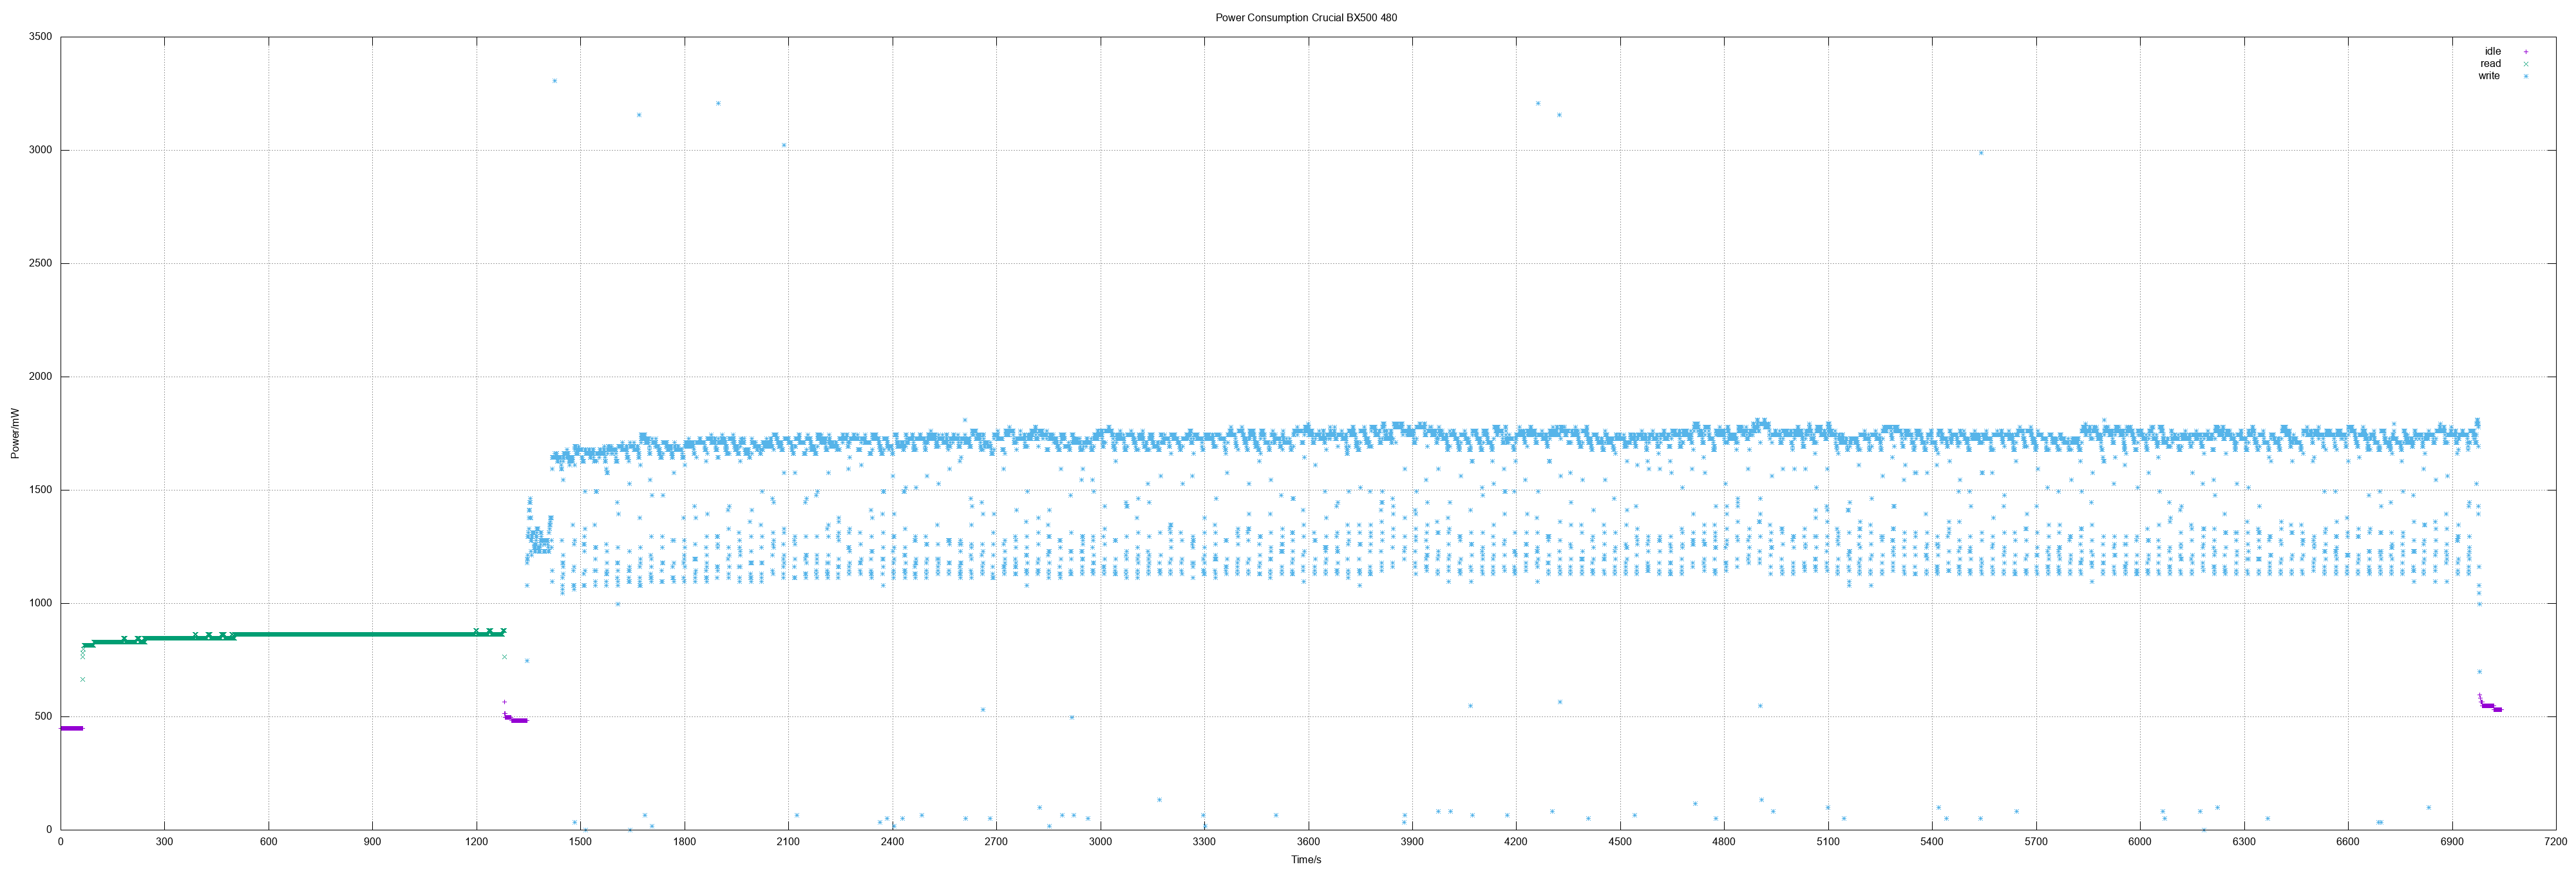
I was curious if the widely used Crucial BX 500 did also "fail" as 480 GB model. And actually it shows the same picture as the 240 GB model: Fine consumption on standby, read values "ok" but high on write - with the same high bandwidth from approx. 1 Watts to 3.3 Watts.
Another two Patriot Burst 240 did also show the same results as the first Patriot Burst 240 measurement.
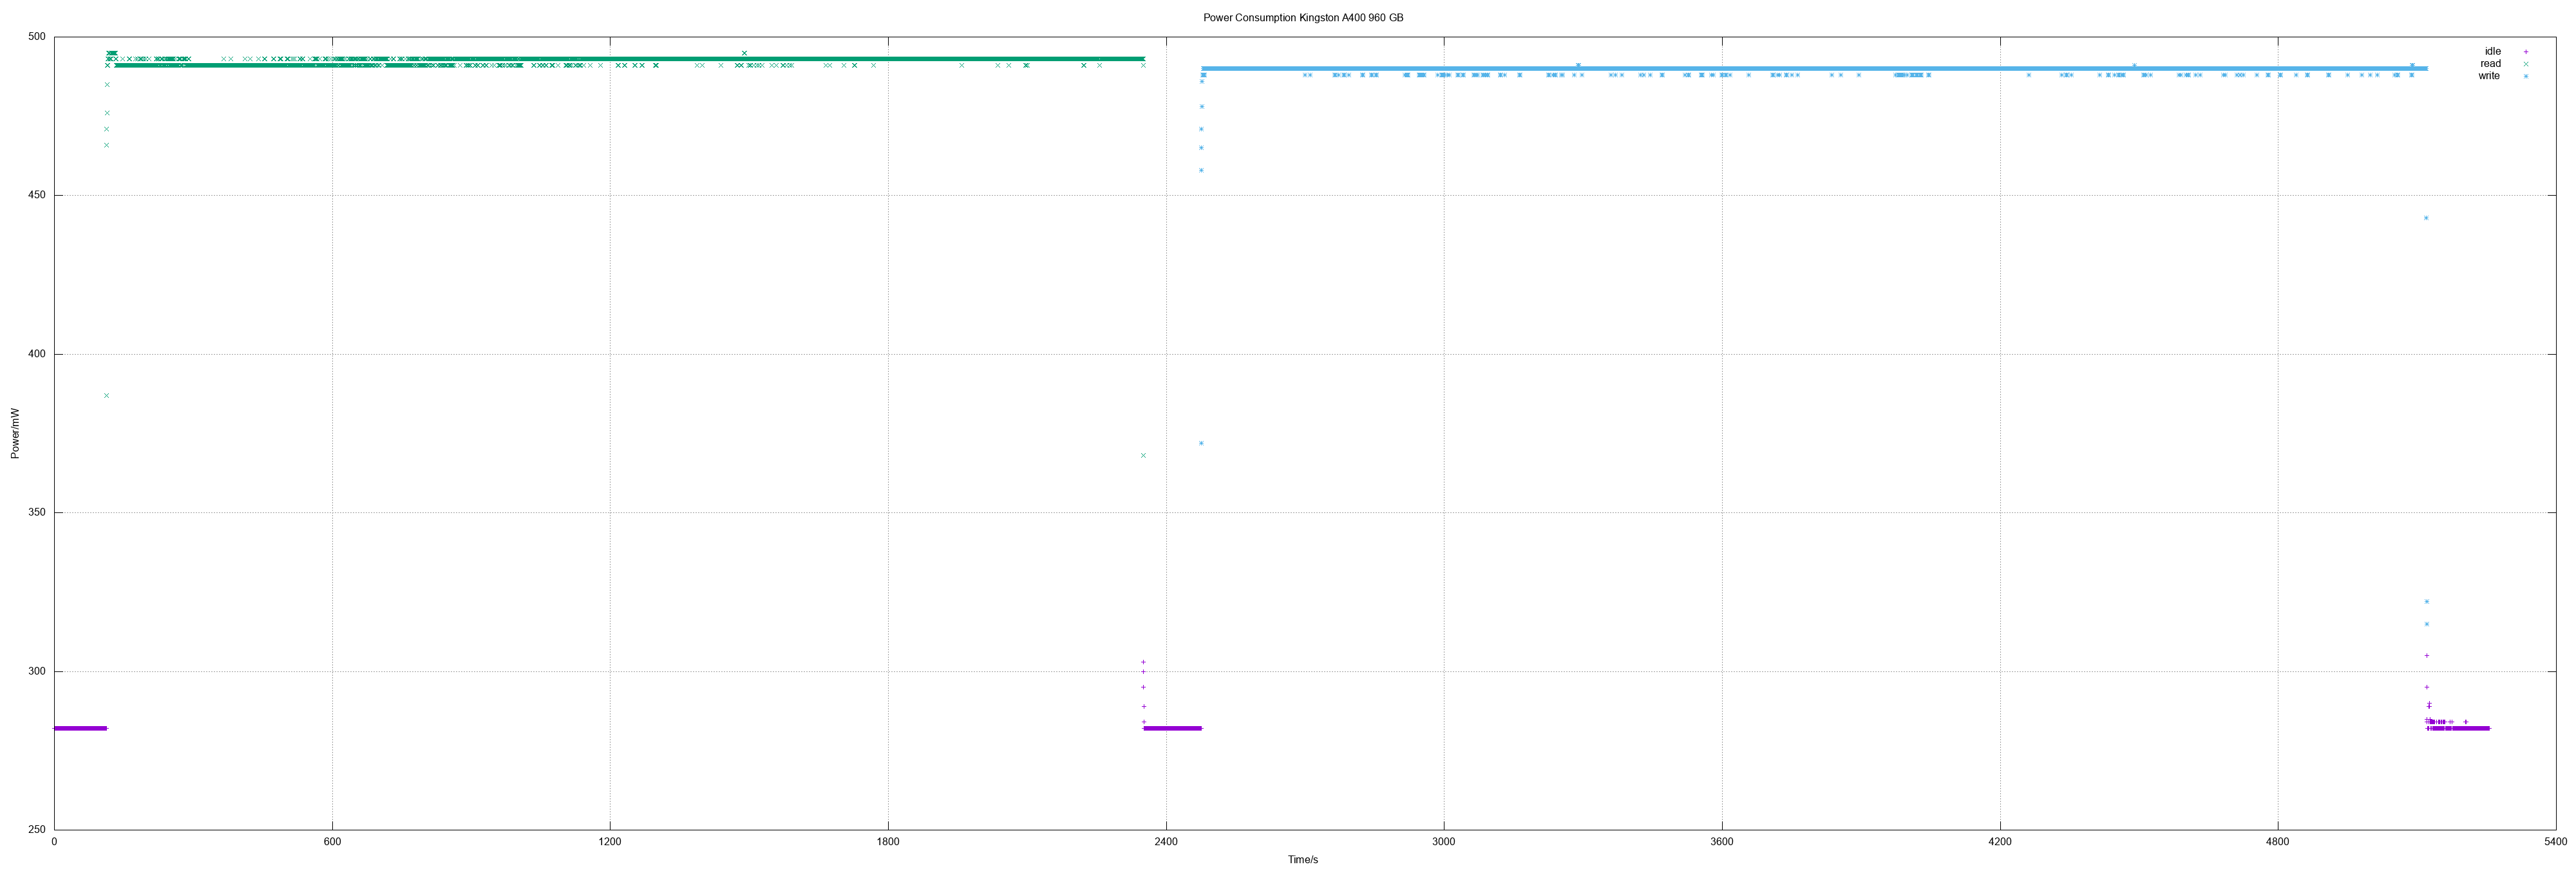
And the Kingston A400 960 was the first "1 TB class" SSD I measured. It did show the same great values like the 480 model did.
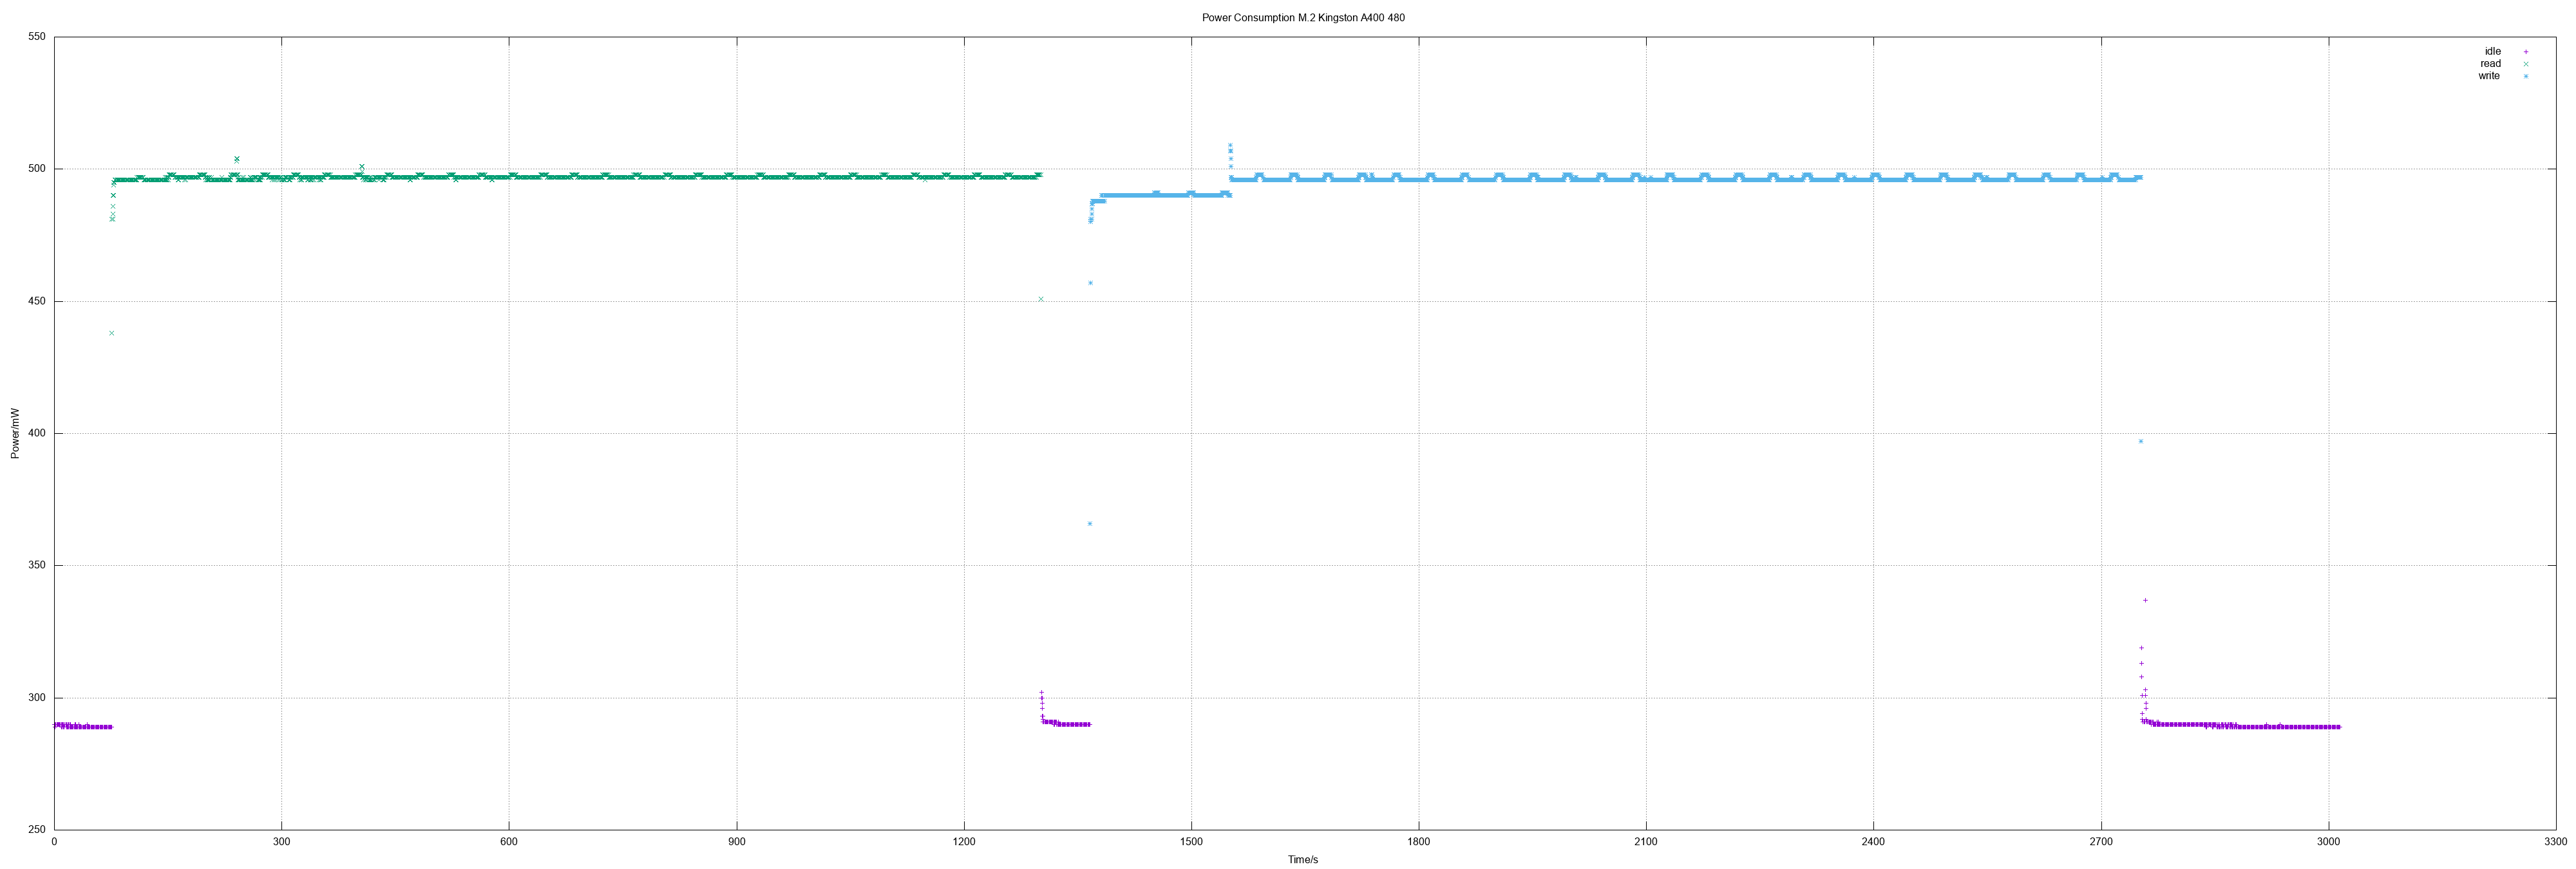
In addition to even more SSDs I made also the first measurement of an M.2 SSD (SATA, of course). Values were the same as for 2.5" SSD.
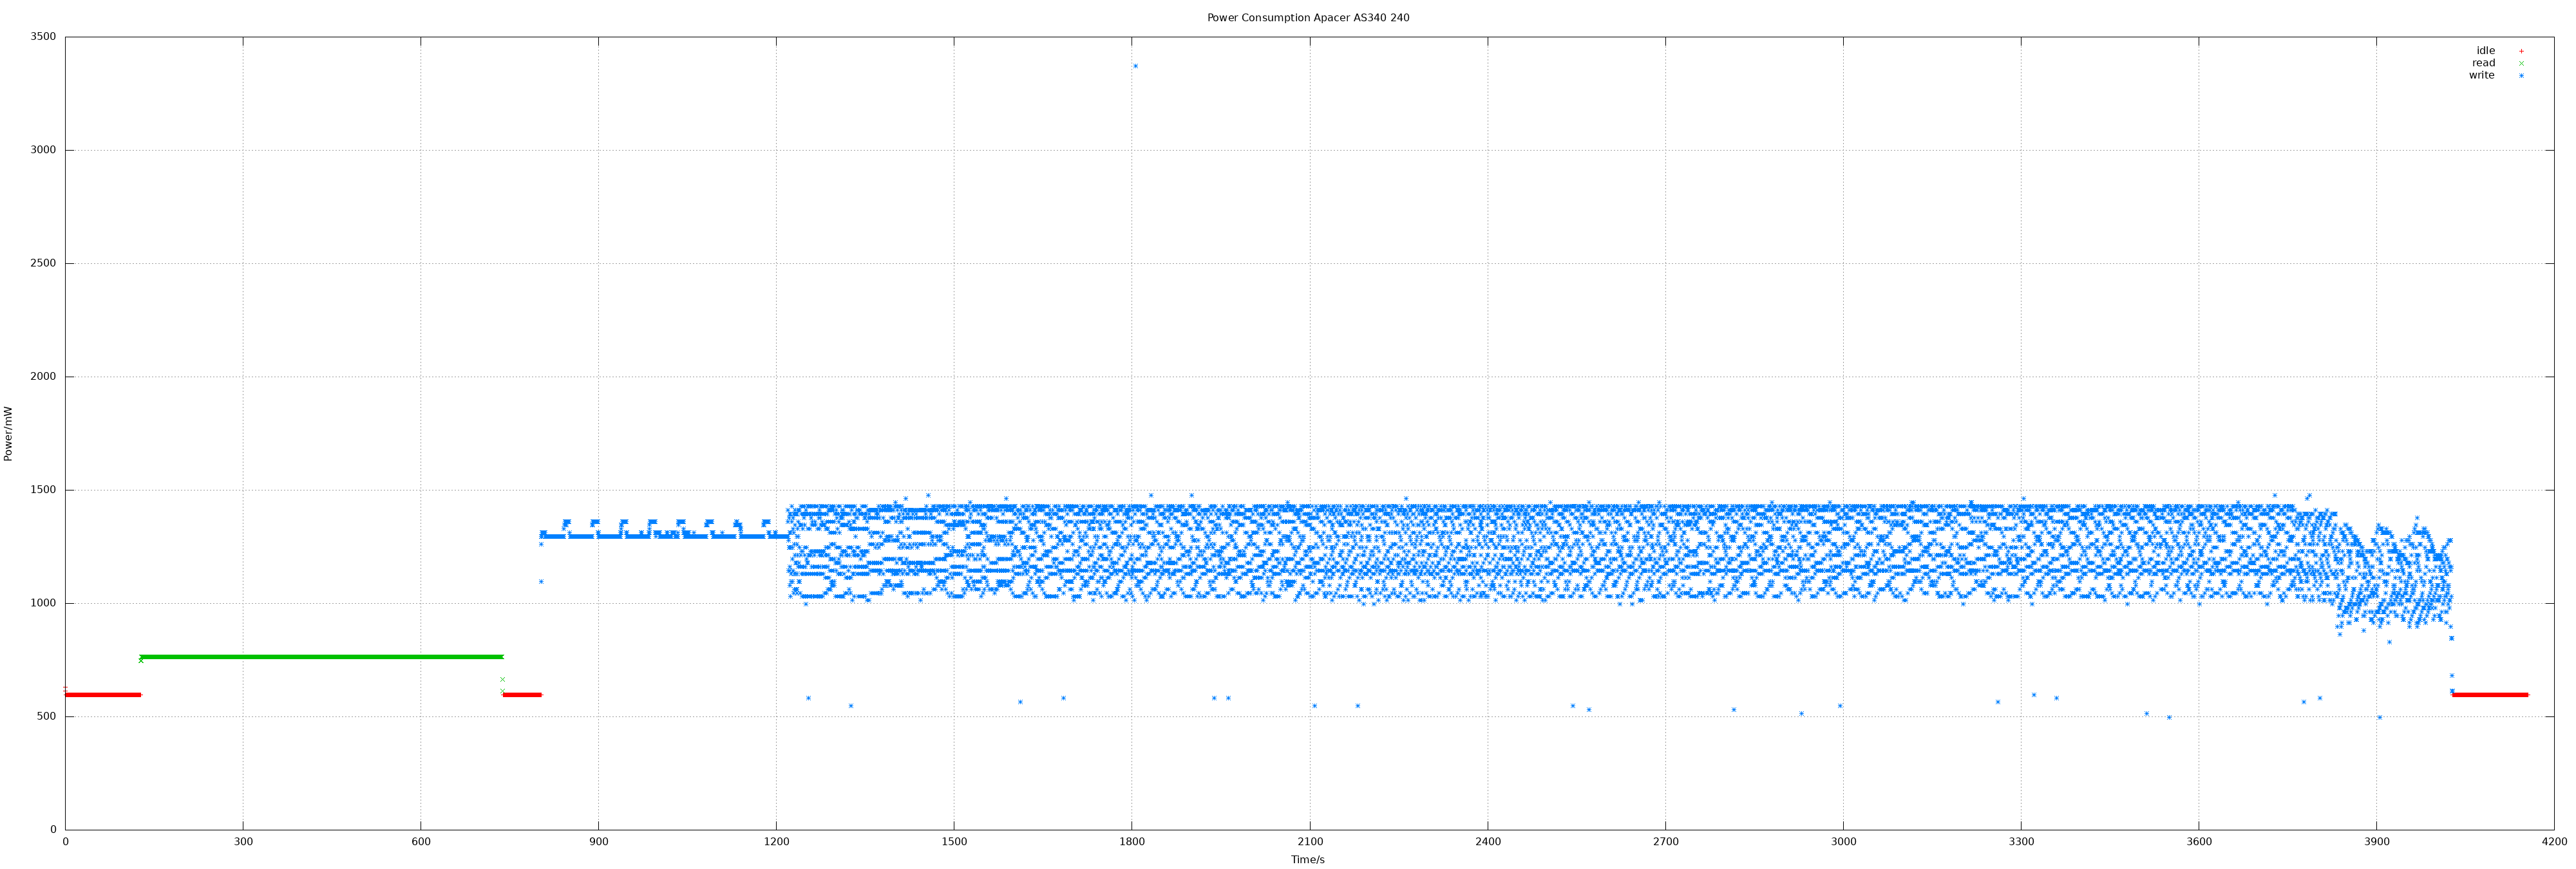
Apacer AS340 240 GB
240 GB means actually 468862128 sectors.
- Idle 0.6 W
- Read 0.76 W
- Write 1.25 W, max 3.3 W
- Read all sectors: 10m15.074s (372 MiB/s)
- Write all sectors: 50m43.854s (75 MiB/s)
Crucial BX500 480
480 GB means actually 937703088 sectors.
- Idle 0.49 W
- Read 0.86 W
- Write 1.66 W
- Read all sectors: 20m25.698s (373 MiB/s)
- Write all sectors: 94m0.830s (81 MiB/s)
Kingston A400 960
960 GB means actually 1875385008 sectors.
- Idle 0.28 W
- Read 0.49 W
- Write 0.49 W
- Read all sectors: 37m22.774s (408 MiB/s)
- Write all sectors: 44m10.833s (345 MiB/s)
M.2 Kingston A400 480
480 GB means actually 937703088 sectors.
- Idle 0.3 W
- Read 0.5 W
- Write 0.5 W
- Read all sectors: 20m29.645s (372 MiB/s)
- Write all sectors: 23m11.808s (329 MiB/s)
Values overview
| SATA SSD | r pow (W) |
w pow (W) |
r spd (MB/s) |
w spd (MB/s) |
|---|---|---|---|---|
| ADATA SU800 256 | 1.4 | 2.2 | ||
| Apacer AS340 240 | 0.76 | 1.25 | 372 | 75 |
| Corsair Force LE 120 | 0.58 | 0.58 | ||
| Crucial BX500 240 | 0.6 | 1.7 | 372 | 99 |
| Crucial BX500 480 | 0.86 | 1.66 | 373 | 81 |
| Kingston A400 240 | 0.52 | 1.08 | 371 | 290 |
| Kingston A400 480 | 0.5 | 0.5 | 371 | 328 |
| 0.49 | 0.49 | 408 | 345 | |
| Patriot Burst 120 | 0.54 | 0.54 | 371 | 86 |
| Patriot Burst 240 | 0.52 | 0.52 | 369 | 327 |
| Patriot Burst 480 | 0.51 | 0.5 | 371 | 328 |
| Samsung MZ7LN128 | 0.97 | 1.57 | 353 | 150 |
| Sandisk Z410 120 | 0.7 | 1.5 | ||
| Verbatim Vi500 S3 240 | 0.59 | 0.98 | 211 | 117 |
| Verbatim Vi500 S3 480 | 0.84 | 1.13 | 359 | 129 |
| WD Green 120 | 0.96 | 1.3 |
| M.2 SATA | r pow (W) |
w pow (W) |
r spd (MB/s) |
w spd (MB/s) |
|---|---|---|---|---|
| Kingston A400 480 | 0.5 | 0.5 | 372 | 329 |
| 2.5 HD | r pow (W) |
w pow (W) |
r spd (MB/s) |
w spd (MB/s) |
|---|---|---|---|---|
| Seagate ST1000LM048 | 2.7 | 2.6 | ||
| Toshiba MQ02ABD100H | 2.6 | 3.0 | ||
| WD WD10SPZX | 1.62 | 2.47 | 256 |
| 3.5 HD | r pow (W) |
w pow (W) |
r spd (MB/s) |
w spd (MB/s) |
|---|---|---|---|---|
| Seagate ST1000DM010 | 2.69 | 2.29 | ||
| Toshiba DT01ACA100 | 2.86 | 2.94 |
Method
Measuring environment is explained in power measuring ADATA SU800. The calculation of speed as logged in latest measurements was simply done by taking the time for reading and writing the whole SSD in relation to its size.
Other measurements
- Crucial BX500 240
- Kingston A400 480, Samsung MZ7LN128
- Patriot Burst 480, WD WD10SPZX
- Patriot Burst 240, Verbatim Vi500 S3 240/480
- Kingston A400 240 GB
- Patriot Burst 120 GB
- Seagate ST1000LM048
- Toshiba MQ02ABD100H
- Corsair Force LE200B 120 GB (2nd disk measured)
- Kingston A400 120 GB
- Corsair Force LE200B 120 GB
- WD Green PC SSD
- ADATA SU800
- Sandisk Z410
2020-02-02 14:31:58
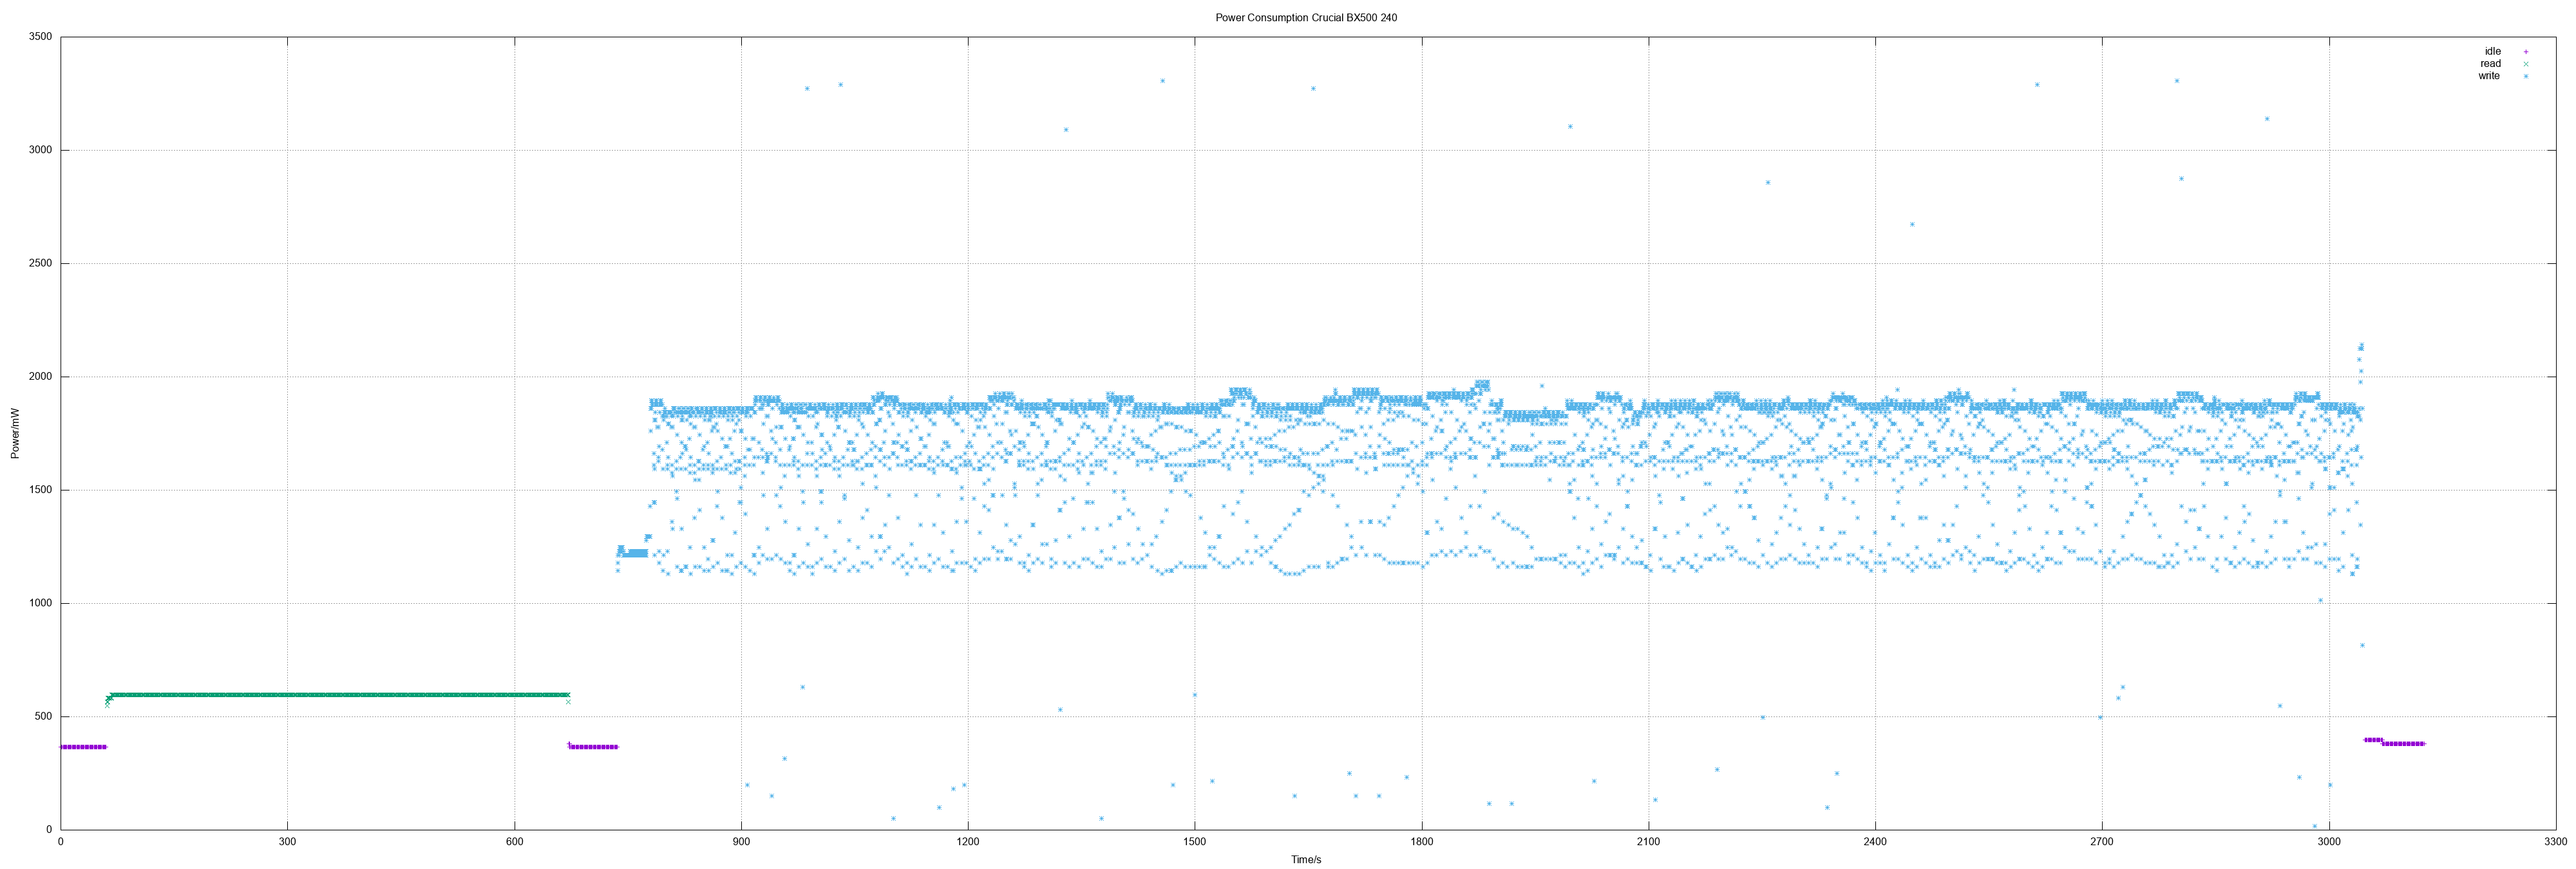
Power Measuring Crucial BX500 240
I ordered a Crucial BX250 because it was several times recommended by german magazine c't (Heise Verlag). It was also part of a recommendation for a DYI low power system "7-Watt-Mini" in c't 24/2019.
Unfortunately I can't understand this recommendation: The SSD has low write transfer rates and has a high power consumption on write. And even its (low) power consumption on read is higher than Corsair, Kingston and Patriot have.
Crucial BX500 240
240 GB means actually 468862128 sectors.
- Idle 0.37 W
- Read 0.6 W
- Write 1.74 W, max 3.3 W
- Read all sectors: 10m14.784s (372 MiB/s)
- Write all sectors: 38m32.850s (99 MiB/s)
Values overview
| SATA SSD | r pow (W) |
w pow (W) |
r spd (MB/s) |
w spd (MB/s) |
|---|---|---|---|---|
| ADATA SU800 256 | 1.4 | 2.2 | ||
| Corsair Force LE 120 | 0.58 | 0.58 | ||
| Crucial BX500 240 | 0.6 | 1.7 | 372 | 99 |
| Kingston A400 480 | 0.5 | 0.5 | 371 | 328 |
| Kingston A400 240 | 0.52 | 1.08 | 371 | 290 |
| Patriot Burst 120 | 0.54 | 0.54 | 371 | 86 |
| Patriot Burst 240 | 0.52 | 0.52 | 369 | 327 |
| Patriot Burst 480 | 0.51 | 0.5 | 371 | 328 |
| Samsung MZ7LN128 | 0.97 | 1.57 | 353 | 150 |
| Sandisk Z410 120 | 0.7 | 1.5 | ||
| Verbatim Vi500 S3 240 | 0.59 | 0.98 | 211 | 117 |
| Verbatim Vi500 S3 480 | 0.84 | 1.13 | 359 | 129 |
| WD Green 120 | 0.96 | 1.3 |
| 2.5 HD | r pow (W) |
w pow (W) |
r spd (MB/s) |
w spd (MB/s) |
|---|---|---|---|---|
| Seagate ST1000LM048 | 2.7 | 2.6 | ||
| Toshiba MQ02ABD100H | 2.6 | 3.0 | ||
| WD WD10SPZX | 1.62 | 2.47 | 256 |
| 3.5 HD | r pow (W) |
w pow (W) |
r spd (MB/s) |
w spd (MB/s) |
|---|---|---|---|---|
| Seagate ST1000DM010 | 2.69 | 2.29 | ||
| Toshiba DT01ACA100 | 2.86 | 2.94 |
Method
Measuring environment is explained in power measuring ADATA SU800. The calculation of speed as logged in latest measurements was simply done by taking the time for reading and writing the whole SSD in relation to its size.
Other measurements
- Kingston A400 480, Samsung MZ7LN128
- Patriot Burst 480, WD WD10SPZX
- Patriot Burst 240, Verbatim Vi500 S3 240/480
- Kingston A400 240 GB
- Patriot Burst 120 GB
- Seagate ST1000LM048
- Toshiba MQ02ABD100H
- Corsair Force LE200B 120 GB (2nd disk measured)
- Kingston A400 120 GB
- Corsair Force LE200B 120 GB
- WD Green PC SSD
- ADATA SU800
- Sandisk Z410
2020-01-25 16:00:49
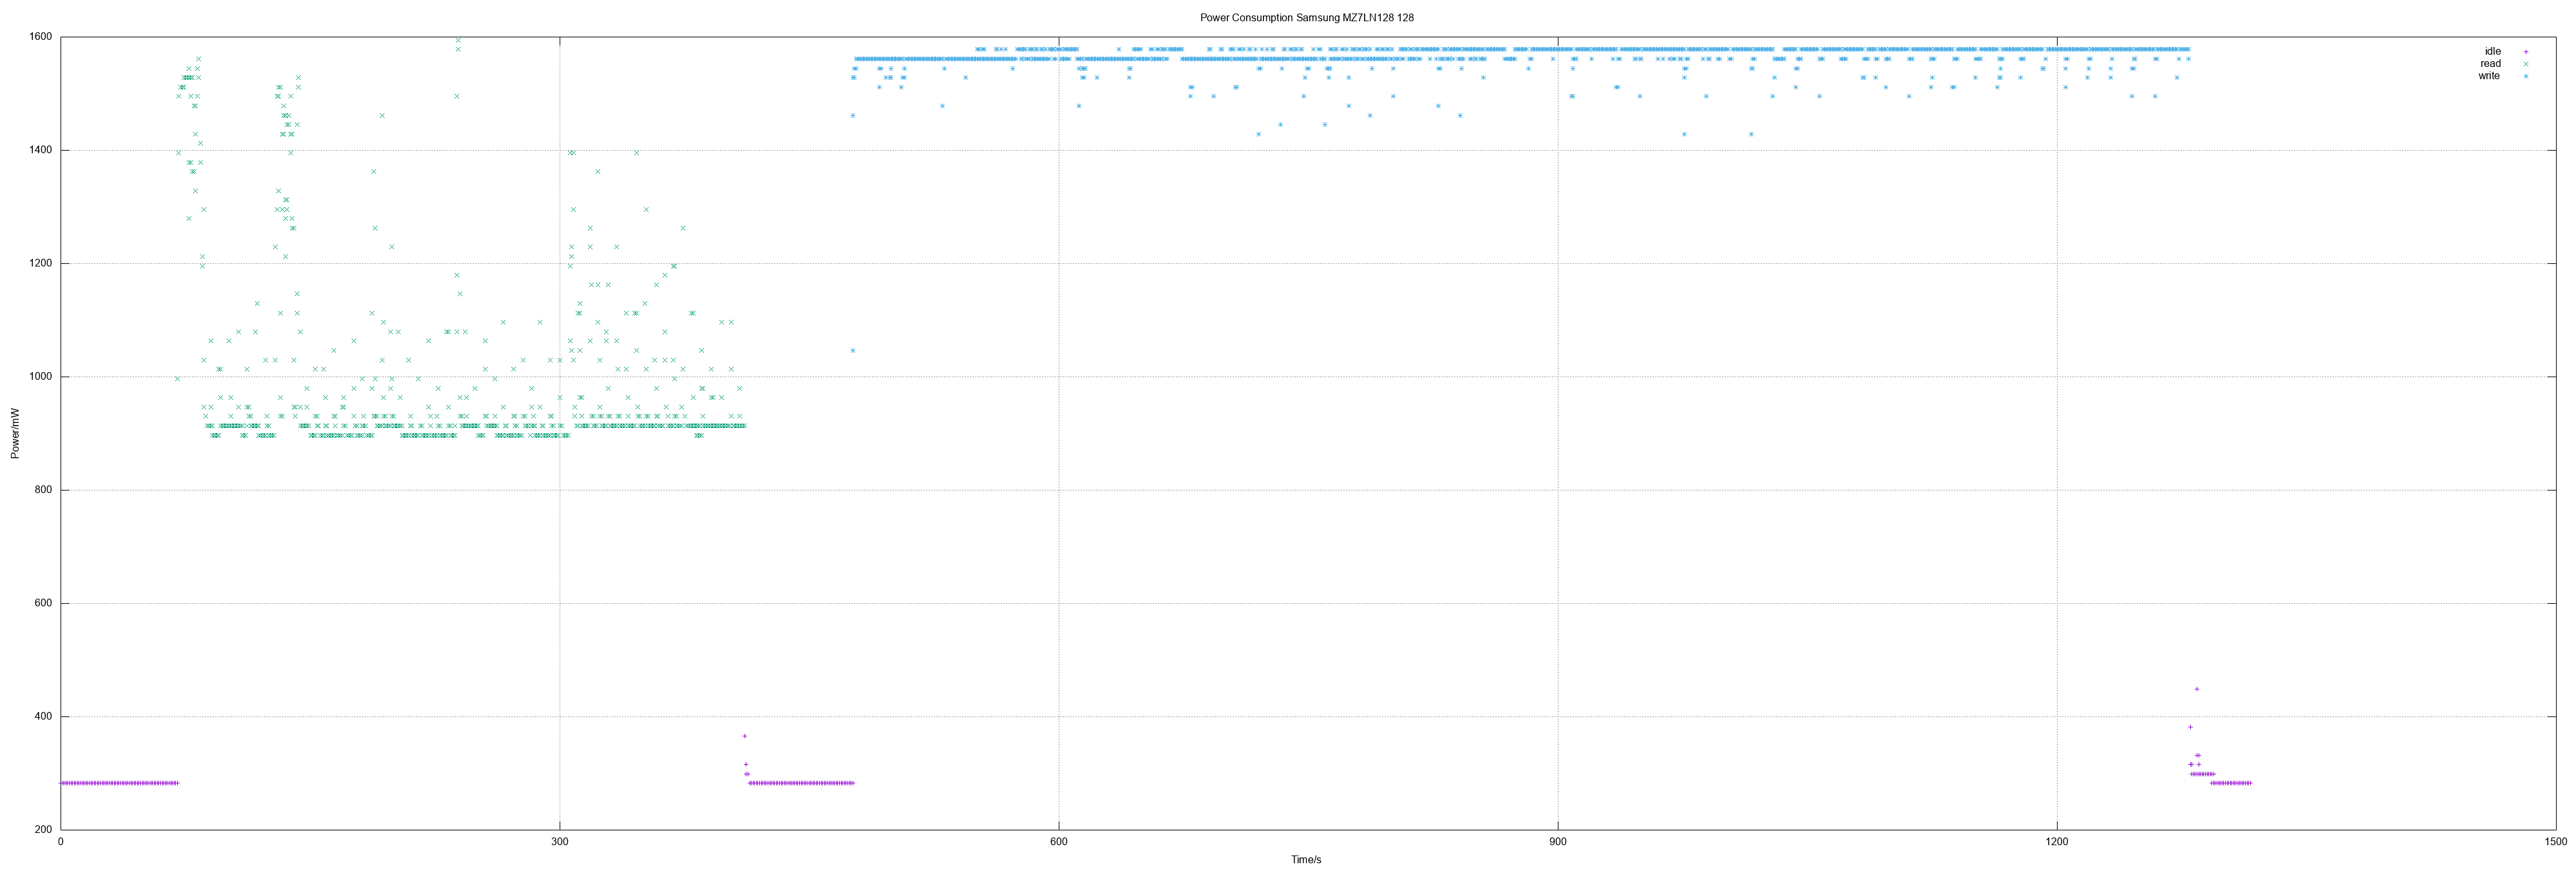
Power Measuring Kingston A400 480 and Samsung MZ7LN128
In this session I measured a Kingston A400 480 which is much better than the smaller sizes. It's as great as the Patriot Burst 480: Very fast and very low power consumption. Additionally an old (used) Samsung 128 was measured.
Kingston A400 480
480 GB means actually 937703088 sectors.
- Idle 0.3 W
- Read 0.5 W
- Write 0.5 W
- Read all sectors: 20m31.041s (371 MiB/s)
- Write all sectors: 23m12.412s (328 MiB/s)

Samsung MZ7LN128
128 GB means actually 250069680 sectors.
- Idle 0.28 W
- Read 0.97 W, max 1.59 W
- Write 1.57 W
- Read all sectors: 5m45.429s (353 MiB/s)
- Write all sectors: 13m32.761s (150 MiB/s)
Values overview
| SATA SSD | r pow (W) |
w pow (W) |
r spd (MB/s) |
w spd (MB/s) |
|---|---|---|---|---|
| ADATA SU800 256 | 1.4 | 2.2 | ||
| Corsair Force LE 120 | 0.58 | 0.58 | ||
| Kingston A400 120 | 0.51 | 1.03 | 371 | |
| Kingston A400 480 | 0.5 | 0.5 | 371 | 328 |
| Kingston A400 240 | 0.52 | 1.08 | 371 | 290 |
| Patriot Burst 120 | 0.54 | 0.54 | 371 | 86 |
| Patriot Burst 240 | 0.52 | 0.52 | 369 | 327 |
| Patriot Burst 480 | 0.51 | 0.5 | 371 | 328 |
| Samsung MZ7LN128 | 0.97 | 1.57 | 353 | 150 |
| Sandisk Z410 120 | 0.7 | 1.5 | ||
| Verbatim Vi500 S3 240 | 0.59 | 0.98 | 211 | 117 |
| Verbatim Vi500 S3 480 | 0.84 | 1.13 | 359 | 129 |
| WD Green 120 | 0.96 | 1.3 |
| 2.5 HD | r pow (W) |
w pow (W) |
r spd (MB/s) |
w spd (MB/s) |
|---|---|---|---|---|
| Seagate ST1000LM048 | 2.7 | 2.6 | ||
| Toshiba MQ02ABD100H | 2.6 | 3.0 | ||
| WD WD10SPZX | 1.62 | 2.47 | 256 |
| 3.5 HD | r pow (W) |
w pow (W) |
r spd (MB/s) |
w spd (MB/s) |
|---|---|---|---|---|
| Seagate ST1000DM010 | 2.69 | 2.29 | ||
| Toshiba DT01ACA100 | 2.86 | 2.94 |
Method
Measuring environment is explained in power measuring ADATA SU800. The speed as logged and calculated in latest measurements was simply done by taking the time for reading and writing the whole SSD in relation to its size.